
Designing your kitchen isn’t rocket science.
Forget theoretics, this is how it gets done.
Follow these basic principles that I use to designing a commercial kitchen space in 5 steps.
For designers or owners, you need operational workflow experience.
I’ve designed food service outlets on a weekly basis for the past 13 years and this is the way I do it every time.
Most other resources will give you theoretical knowledge but this is how it gets done.
Here are the steps how I break it down every single time:
That’s it.
This guide is best applied for restaurants with up to 200 seats.
Other food service operations differ in workflow and how they need to be thought through.
With that let’s quickly move forward.
Be sure to subscribe below and get all the best and detailed foodservice stories you won’t find anywhere else!
Starting from scratch
First things first, you need an AutoCAD file.
This will help you scale the real estate.
You should receive it from the client or architect, if not then pull out your measure tape and start measuring the walls.
Each area of space available to you needs to be foreseen in the operation.
To know where the food comes in, gets processed, stored, then delivered to before being cooked and sent to the guest.
These are common spaces for any kitchen with a capacity of up to 200 seats.
- Receiving Area
- Prewash
- Cold Room & Freezer Room
- Dry Store
- Vegetable Area
- Chicken Area
- Meat Area
- Garde Manger
- Dessert Preparation
- Cooking
- Dispatch
- Dishwashing (With a space for receiving, prewash + exit table alongside a shining table)
There are other spaces to account for like employee lockers, chefs’ office but lets keep it simple and focus on the heartbeat of the restaurant, the kitchen.
If you’re missing any of the zones above it doesn’t mean you cannot operate.
If for example, you don’t have the space for a chicken, meat, and vegetable area separately then you need to be sure to set a schedule to sanitize each area in between work shifts so there is no cross-contamination when preparing food.
When designing with HACCP ( Hazard Analysis and Critical Control Point) in mind here is a basic golden rule;
Where raw food passes shouldn’t not cross over where cooked food crosses.
So plot your workflow accordingly.
I like to start off next by setting the walls in place.

Equipment depth is usually 70cm.
The passageway for someone to work is usually 80-100cm.
When adjusting the space in each work area, you need 220-240cm just like above.
There are endless ways to design the same space for a commercial kitchen.
Next, I want to set the workspaces in each zone.

By rule of thumb, its a good idea to get to know preliminary equipment needs.
For example, if your client needs:
- 6 burners
- 3 fryers
- 2 chargrills
Its going to take less space in the ‘cooking zone’ than needing:
- 6 burners
- 3 fryers
- 2 chargrills
- 1 Combi Oven
- 1 Boiling Pan
Once you set out all the spaces you should then sit with the client or the chef for remarks and feedback.

Once that’s settled you want to move onto the Equipment Phase.
Design Styles
Among most layouts designed there the three most common workflows which I’ve come across. Being:
- Assembly Line’s
- Boxed Zones
- Wrap Around
Let’s take a brief look at each.
Assembly Line’s
Assembly Line’s are when you have good real estate.
That means there’s enough space to accommodate each space separately.
This set-up is for larger restaurants with more seating capacity because they need to prepare more food.

When using an assembly line, always use half walls.
You will lose space for wall shelving or even table shelving but it opens up for better communication in the kitchen and better control on staff.
The spaces are organized in a line here with each food prep area in blocks moving from one end to the other until the service area where you have final pick up.
Boxed Zones
In this approach, the areas are boxed compartments.
If you don’t have the luxury of all the space like an Assembly Line then the boxed spacing method will create the zone’s but not necessarily moving ‘down a line’
Each space however is still separate from the other.
This approach should still follow principles of food safety but mapping them comes out differently.
You’re essentially putting blocks of space side by side for the most important spaces mentioned in section 1.
Wrap Around
In this approach, space is limited.
As a designer, you will need the chef and owners feedback because space is tight and operational workflow is paramount.
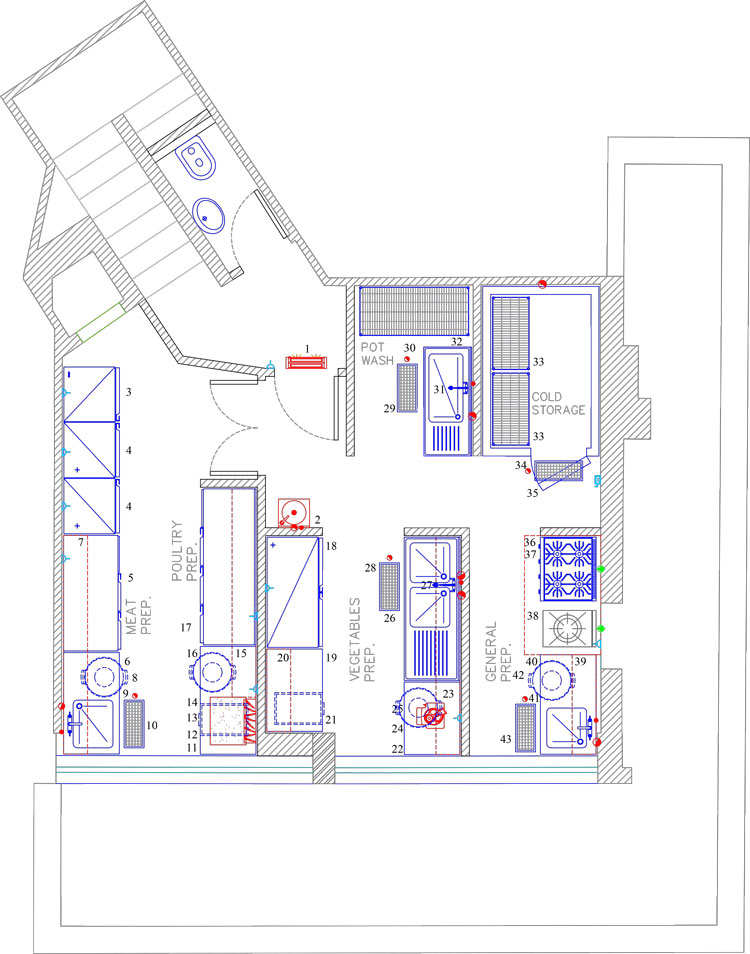
Here’s an example of a kitchen space I set up for a client serving 120 people.

There are no separate ‘zones’ for each but with the head chef (who was also the main consultant) we placed each piece of equipment carefully keeping in mind how the kitchen was going to operate.
Meat and Poultry areas ended up being separated but you get the idea how Dessert and Vegetable wash ‘wrap around’ the cooking area.
This layout is usually open.
Here is another example
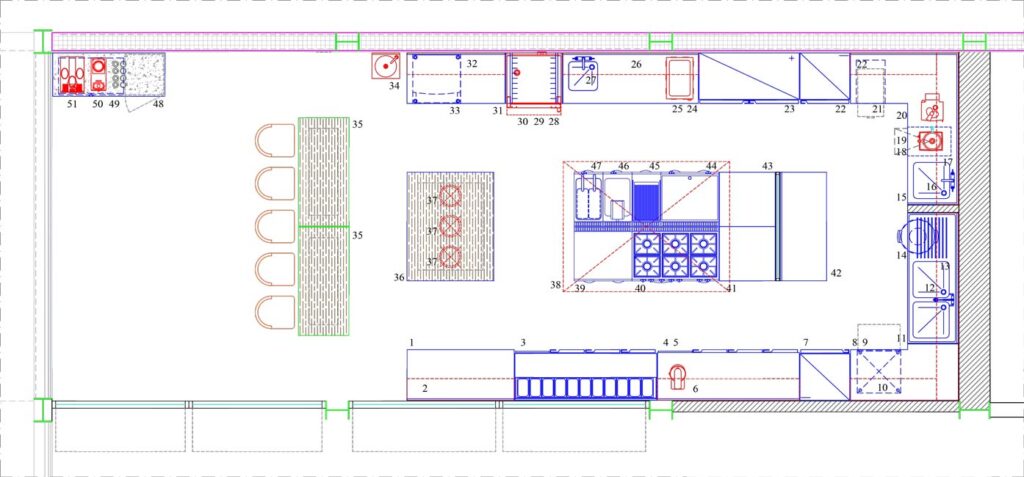
The flow wraps around the kitchen walls from processing to finishing to delivery (above example in the middle).
This is Spine which won the 2019 Best Overall Bar Design where the prep area wraps around the cooking area as well and we separated the dessert section to be served from another area.
Here is more on the awards for Spine.

Equipment Requirements
There is basic required equipment in each workspace from the list I mentioned above.
This is what they are.
Receiving Area

- A platform scale (to weigh food delivery)
- Mobile table or platform trolley
- Deboxing table
- Insect Killer
- Air blower
- Hose Reel
- Platform Trolleys
It’s ideal to have:
- A door between this area and the main kitchen.
- Double entrance if your receiving space is in a garage to avoid fumes of a delivery truck.
Prewash

- Receiving table
- Prewash sink with double bowl for prewash (some veggies and fruits get delivered in their natural state across some countries)
- Shelving Unit
- Floor Grating
- Hose Reel
- Vegetable Dryer
- Potato Peeler (or other)
It’s ideal to have:
- A space for a trolley wash
Once pre-washing is done in the operation it’s ideal to have a space for hosing down the platform trolley.
Cold Room & Freezer Room

- Cold Room
- Freezer Room
There are 3 main types of rooms.
- With Ramp
- With Floor
- Sunk-in

A ramp is placed incase a service delivery trolley carrying heavy and bulk foods are brought into the room (usually larger rooms and operations)
A floor is a traditional room with a hinged door.
Sunk-In models are used so that there is no ‘step up’ into the cold room.
There will be a groove in the floor so that the room is sunk into the floor.
This needs proper setup by the contractor.
This is a typical cross-section.

Dry Store

There will be a door with shelving inside for the dry store.
Larger operations divide the store into different areas such as:
- Dry food store
- Packaging and restaurant material
- Beverage store
Depending on the staff responsibilities each one is given a key and responsible for stock keeping.
Vegetable Area

- Double or Triple bowl sink
- Work table
- Drawer set
- Knife sterilizer
- Vegetable cutter
- Reach in refrigerator
- Cutting board
- Knee operated hand sink
- Garbage Bin
- Floor grating
Chicken or Poultry Area

- Double bowl sink
- Work table
- Drawer set
- Knife sterilizer
- Reach in refrigerator
- Cutting board
- Knee operated hand sink
- Garbage Bin
- Insect killer
- Floor grating
- Other poultry equipment requirements on chef’s command
Meat Area

- Single bowl sink
- Work table
- Meat Mincer
- Food processor
- Butcher Block
- Drawer set
- Knife sterilizer
- Reach in refrigerator
- Cutting board
- Knee operated hand sink
- Garbage Bin
- Floor grating
Garde Manger

- Work table with sink
- Orange juicer
- Reach in refrigerator or table top refrigerator
- Juicer
- Drawer set
- Knee operated hand sink
- Garbage Bin
- Insect killer
- Slicer
Dessert Preparation

- Worktable
- Marble top working table
- Worktable with sink
- Ice cream machine (if required)
- Tabletop or Reach-in freezer
- Table top Mixer
- Scale
- Convection oven (depending on menu)
- Deck oven (if required)
- Microwave
- Bain marie (if required)
- Gas Burners
- Trolley
Cooking

Dishwashing

- Receiving table
- Either rack overshelf on the table or on wall
- Pre-wash table with sink and garbage hole
- Garbage Bin
- Grease interceptor
- Dishwasher
- Exit table
- Angle ledges for racks or rack dolly
- Shining table
- Shelving
- Floor Grating
Read here for more on the definitive guide to restaurant dishwashers.
Review for Overlap
Depending on the country there are rules and regulations to abide by for food safety.
One of the most important is HACCP, the other is following a protocol named ISO.
Here is a really long in-depth guideline on HACCP by the FDA. (Source)
In section 2 I showed you each typical space and required equipment needed.
But what if you don’t have space for each section and need to follow the boxed or wrap-around method?
What do you do?
You sit with the client or chef and review spaces for overlap.
As mentioned in part 1 about scheduling this applies across the board in all parts of the operation.
There is no ‘one fits all’ playbook for different sizes and different seating arrangements.
It depends on the type of restaurant and the menu and the work schedule.
The food and the operation (along with spaces the employees work in common) need to be mapped out then it is up to the owner to decide a timestamp on where each one works.
MEP
The meaning of MEP stands for Mechanical, Electrical and Plumbing.
MEP is the process of planning, designing, and engineering MEP systems into any infrastructure.
This is for the construction phase of the restaurant or foodservice outlet.
It’s also pretty simple to do, if you have experience.
Experience comes from drawing a concept all the way through to actually seeing it realized.
Then seeing your kitchen in operation to ask yourself, was that plug at the right spot or is it causing a headache for the operator?
First, there are electrical loads.
Most foodservice equipment have electrical properties on the brochure, you can download most brochures on a company’s website.
Then there’s the gas consumption.
Cooking equipment will be gas-operated depending on which country your in and how much electricity costs.
You need to set the gas outlets and locations on the cooking suite or for the equipment lined up on the wall.

Lastly, is plumbing which needs the most experience.
The plumbing part includes:
- Potent water requirements (for coffee machine and dishwashers)
- Hot Water
- Cold Water
- Drain
Many kitchen equipment companies have in-house engineers to review the entire map and all outlets.
You will refer to him or her to get a green light before passing along to the client.
That’s pretty much it.
Do you think this was a helpful guide?
Comment below!


